Wednesday, October 30, 2013

Oh, Joy!


Which also means, anything goes!
So for this weeks sample project, i made letter blocks with the word JOY. The nice thing is, you can make it as long or as short as you want! MERRY, SNOW, CHRISTMAS, etc. 
I have to say, i made the little boxes myself, and it was a bit of a chore. but once i got the hang of it and had the boxes put together, the rest was easy! 
I made the boxes out of Coastal Cabana cardstock, and covered them in Patterned Paper squares. the rest is easy layering. for the letters, i used my Big Shot to die cut them out of Silver Glimmer paper, then just adhered them to some Coastal Cabana scraps and cut around the letters, creating a mat. For the middle of the "O" i used the small oval punch. the snowflakes are embossed in silver, and the middle one has a Rhinestone.  I also wrapped Silver Ribbon around each cube to bring it all together

Supplies:
Cardstock - Coastal Cabana, Whisper White
Ink - Coastal Cabana
Stamps - Festive Flurry, Daydream Medallions
Typeset Alphabet Bigz Die, In Color Patterened Paper - Coastal Cabana, Silver Embossing Powder, Rhinestone, Festive Flurry Framelits Dies, Large Circle Punch, Silver Glimmer Paper

Wednesday, October 23, 2013

Have Your Cake!

The theme this week at Stampin' Royalty is a Picture Inspiration! 
here is the image:

as you can see, i took my inspiration from the colors, and some of the patterns and textures in the photo. 
I marked then made cuts so that i could thread a strip of Basic Black through the top portion of the white panel, then i used my Simply Scored to make the score marks, then used the embosser for the bottom portion. I used white Craft ink then embossing powder for the sentiment. I added the silver Glimmer paper to give it some fun sparkle!

Supplies:
Cardstock - Basic Black, Very Vanilla, Whisper White
Stamps - Sketched Birthday, Yippee-Skippee!
Accessories - Silver Glimmer Paper, Circle Punches, Scalloped Circle Punch, Simply Scored, Adorning Accents Edgelits, Adorning Accents Folders

Wednesday, October 16, 2013

Gone Batty!


This weeks Stampin' Royalty Challenge is Halloween Goodie Packaging!

This project was actually really fun to put together! i don't normally make things for Halloween because i never have use for them, but i think Halloween stuff can be soooo fun! 
This packaging can be used for so many things! fill the bag with whatever you like! popcorn, cookies, candy...or all of the above!
This was also my first time using my Witches Brew Washi Tape on a project of my own!! originally, i wasn't sure how i would feel about it, but i really like it! Its just another fun little toy to play with in my stamp room whenever and however i like! very versatile! 

Here are some things i feel i should point out:
The button on the top is covered in...you guessed it....Washi Tape! What a fabulous idea! got an ugly button? Cover it with some fabulous Washi! just stick it on, and poke through the holes with your paper piercer, sharp scissors, or a pen. The Yellow Striped Tag came from the Tag A Bag Accessory Kit, as did the orange Bakers Twine.  I used the Witches Brew Washi Tape along the top and in a criss-cross on the bottom. 
For the Witches hat, i first punched an oval out of Basic Black Cardstock, then just free-hand cut the top portion. I stuck the bottom of that portion into the oval punch to round it out, then did the same thing with a Pumpkin Pie piece. then i just finished feeding the piece through the punch to make the band. i free-hand cut the buckle out of Crushed Curry and Pumpkin Pie.  For the bat, i used the body from the Owl Builder Punch, then punched with a small circle punch along the bottom of a scrap piece of Basic Black. I then used my 1 -1/4  Circle Punch to create the wings.  i drew his mouth with a White Gel Pen. 
I really like how this turned out!!

Supplies:

Stamps - Seasonal Saying
Markers - Pumpkin Pie, Crushed Curry, Early Espresso, Rick Razzleberry
Cardstock - Crushed Curry, Basic Black, Rich Razzleberry, Naturals White, Pumpkin Pie
Accessories - Witches Brew Washi Tape, Oval Punch, Owl Builder Punch, 1 -1/4 Circle Punch, Small Circle Punch, Tag a Bag Gift Bags, Tag a Bag Accessory Kit, Black Button, White Gel Pen

Wednesday, October 2, 2013

Fall Sparkles

This weeks Stampin' Royalty Challenge is a Picture Inspiration! 

here is the image:

believe it or not, this card took me a very long time to design and get just right, but now that i'm done, the nice thing is, if i wanted to make more, it would be much easier :o)

the one thing i think i need to explain are the letters. i basically die cut the word in 2 different colors, one in Early Espresso, the other in Champagne Glimmer Paper.  then i just layered them on each other, offsetting just a little.  The other thing i should mention is the "blessings" part. That is actually just a portion of a full stamp from the More Merry Messages stamp set that i colored with my Early Espresso Marker.  

Supplies:
Cardstock - Very Vanilla, Early Espresso, Pumpkin Pie, So Saffron, Old Olive
Stamps - More Merry Messages
Accessories - Champagne Glimmer Paper, Bigz Alphabet Typeset Die, Boho Blossoms Punch, Small Oval Punch, Bird Builder Punch, Needlepoint Border Embossing Folder, Baked Brown Sugar Patterned Paper,  Early Espresso Stampin' Write Marker

Wednesday, September 25, 2013

Festive Flurry Flakes

The theme this week at Stampin' Royalty is Triangles! 

as you can see, i used triangles on the back panel. it was really easy to cut these. I just made a guide line from one corner to the opposite diagonal corner on each side, then trimmed it. it is easiest to glue the pieces on, then run the whole thing through an embossing folder in the Big Shot. I embossed the snowflakes in silver, although it looks like gold, and gold would be FABULOUS, but i used silver...
The rest is pretty self explanatory. Easy and fun to make! :o)

Supplies:
Stamps - Festive Flurry, Four the Holidays
Cardstock - Real Red, Whisper White
Ink - Real Red
Accessories:  Petals-a-Plenty Embossing Folder, Silver Embossing Powder, Festive Flurry Framelits Die, Silver Ribbon, Rhinestones, Versamark

Thursday, September 19, 2013

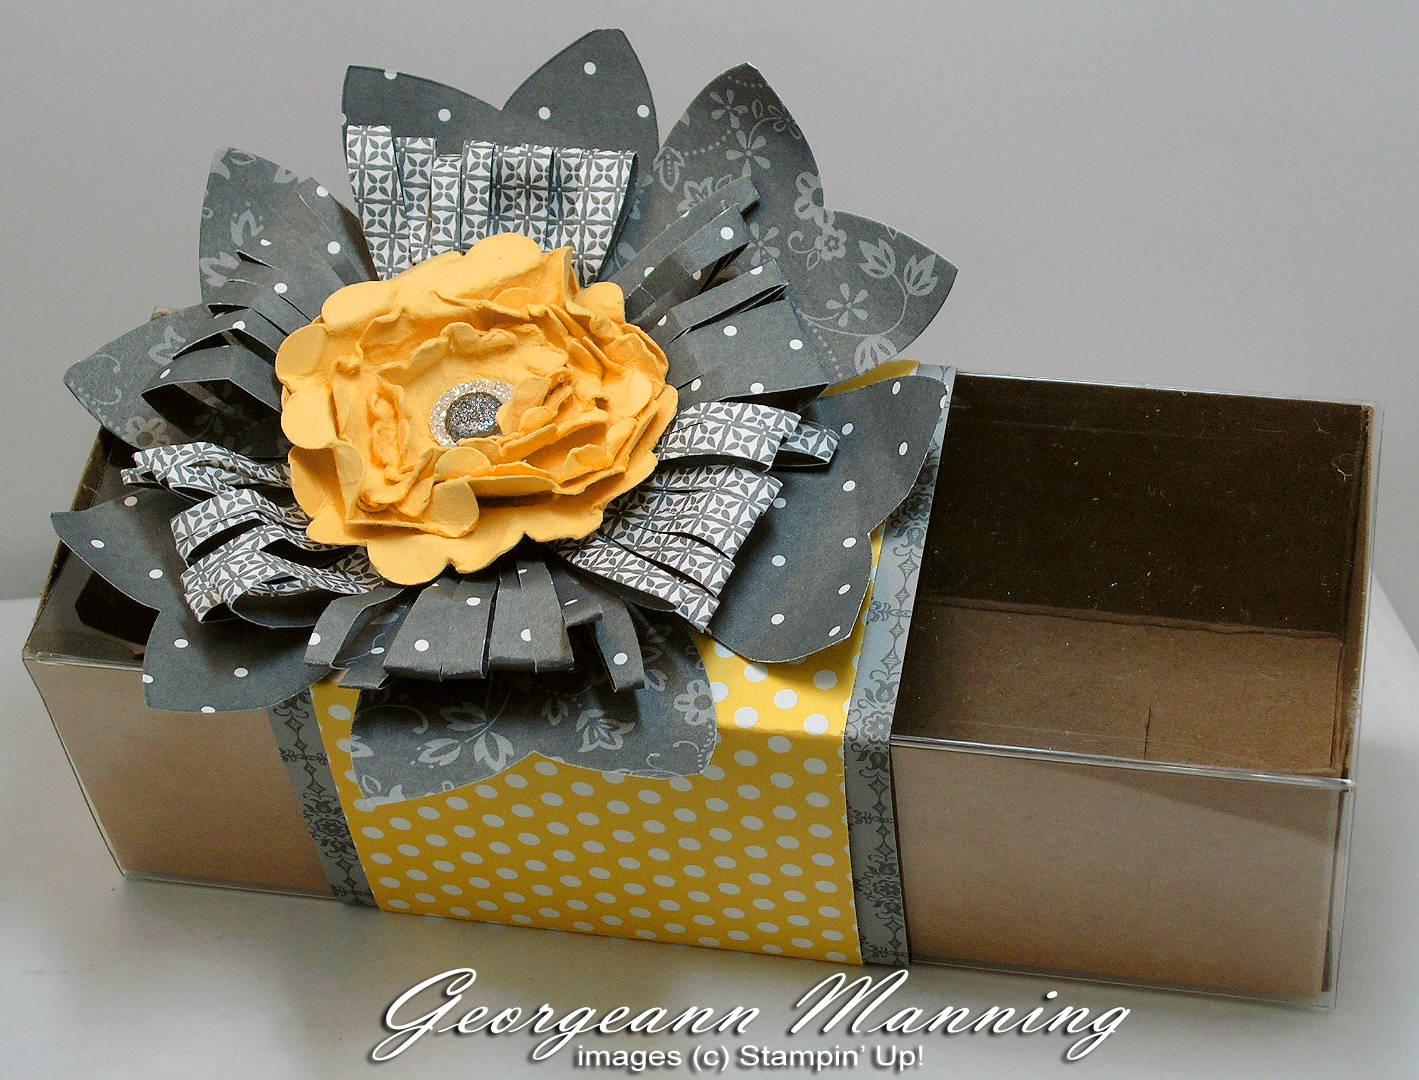
Petals on a Present


I used my Gift Bow Bigz Die to make the base of the flower, then 3 different sized scallop circle punches to make the flower.  i added some Silver Glimmer Paper, and a Glimmer Brad to finish it off. I added a 'belly band' around the Tag a Bag Gift Box and was all ready to put something wonderful inside! 
To make the fringed flower part, i die cut the bow pieces, then folded them in half, flattened them, then started cutting along the outside portion, in a fringe pattern. then i scrunched them up to give it volume.  Really easy, and didn't take long at all!  This flower would look really cute on a gift bag too! 

Supplies:

Scallop Circle Punches
Glimmer Brads
Silver Glimmer Paper
Tag a Bag Gift Box
Gift Bow Bigz Die
Patterned Paper - Daffodil Delight, Basic Gray


Thursday, September 12, 2013

Undefined


One of the many wonderful things we got at convention was a sample piece of the Undefined stamp carving kit!  Undefined is a kit that includes all the fixin's you will need to carve and create your very own stamps! the sky is the limit! 
This was my first attempt at carving a stamp. I had to think long and hard about what i wanted to make. Well, because i am known as the Paperprincess, and i am one of the Stampin' Royalty Goddesses, i figured i should make a crown! 
You begin by sketching a picture with pencil, transferring the image to the rubber, then carving. My crown kind of looks like a ring, but oh well, not too bad for a first attempt! it really was fun though, but the best part is inking it for the first time and seeing how the image turns out! I have shown the image, and how i used the image on a mini card :o)
Hope you like it! 

Tuesday, September 10, 2013

A few Little Notes


Just a quick Tuesday post...
I was asked by a friend to make about a dozen small fairly simple 3x3 thank you cards for her. 
These are what i put together...
I actually had a lot of fun making these, mostly because almost everything i used was from my scrap pile! It's almost like a game to me to see what i can come up with using only my scrap box. Granted, i did have to cut into a few new pieces of cardstock for the bases, but i think i can live with that :o)


Wednesday, September 4, 2013

A Forest Snowfall


I would love to walk through the woods while a gentle snow falls, wouldn't you?
Now that school is back in session, it's a reminder that Christmas is on its way! And oh, how i LOVE all things Christmas!
This is my sample card for this weeks Stampin' Royalty, which is all about Patterned Paper! 
I got the inspiration from THIS beautiful card.  i couldn't find who originally made the card, as there is no link or name on the card, so if you know who created it, let me know and i will be sure to give them all the due credit!

For this one, the cardbase is Naturals White, and the next layer is Vanilla Patterned Paper, but it is REALLY difficult to tell in this picture. The background on the main image panel is Pool Party and Pink Pirouette.  I  die cut the trees using Pistachio Pudding. :o)  The mat is Baked Brown Sugar. I created the snowflakes by putting sticky sheet on the FRONT of some Whisper White cardstock, then pressing the sticky part into some Dazzling Diamonds glitter. I sponged the edges of the elements on the main panel and stamped the words in Baked Brown Sugar, put on some pearls, added a little faux stitching, and was done! I like it :o)


Supplies:

Ink - Baked Brown Sugar
Cardstock - Naturals White, Baked Brown Sugar
Stamps - Delightful Dozen
Accessories - Holiday Collection Framelits Dies, Northern Frost Die, Pearls, Stampin Up Designer Series Papers, Dazzling Diamonds, 

Wednesday, August 14, 2013

A Little Cantaloupe with Brown Sugar on it


My project for this weeks Stampin' Royalty Challenge was made from a Picture Inspiration. here is the picture:

Don't look too closely at the one brown hexagon...yes, its the wrong orientation. i realized that after i put it all together, but i was on a tight schedule...haha.
I kind of had an idea of what i wanted to make, but didn't have all the tools to do it. i know, bummer, huh? 
so i actually made the little geometrics by hand, then ran them through the Big Shot in an Embossing Folder. 
I used Crisp Cantaloupe, Baked Brown Sugar, and Naturals White for this card.  I did a lot of sponging for the background and around the edges of the patterned paper and on the main panel.

Wednesday, August 7, 2013

Small Scraps, Big Impact


This is my sample for this weeks Stampin' Royalty Challenge, Big uses for Small Scraps! 
i have so many scrap strips that i would love to put to good use, and this was the week to do it! 
I staggered them and varied the patterns/colors to create a background for my ornament.  
I cut the sentiment out by hand, and used my ornament dies. I also used the Simply Scored to make a little frame around the whole card panel. 

Wednesday, July 31, 2013

Little Gifts


I handmade this whole gift box. i love the look of polka dots, and i wanted the box to have them, so i needed to make my own polka dot cardstock. I used a circle from the Daydream Medallions set to stamp on the cardstock with versamark, then i used white embossing powder. 
During the Stampin' Up convention, I was the lucky winner of the Gift Bow Bigz Die!! so i wanted to use it for the first time on this project! we also got the Tag It stamp set, and i used that to make the tag, but i only inked the border part with my Real Red marker, then stamped the 'to-from' using Basic Black.  I cut out the tag, then hand cut out a mat for it, added a small rhinestone, and tied it to the box. the 'ribbon' is made with Silver Glimmer paper and Real Red.  Gives it that extra little sparkle! 

Supplies:

Cardstock - Sahara Sand, Real Red
Stamps - Tag It, Daydream Medallions
Accessories - White Embossing Powder, Silver Glimmer Paper, Gift Bow Bigz Die, Sahara Sand DSP, Versamark, Rhinestones

Tuesday, July 23, 2013

WOOHOOOO!!!!! 100,000!!!!

I just wanted to make a quick post in celebration of 100,000 page views to my blog!!! 
This makes my little heart very happy! 
I'm so glad you all like to come visit me! 
Keep coming by, there will be a few new things coming soon!!!

Wednesday, July 17, 2013

Lots 'O' Layers!


here is my sample card for this weeks Picture Inspiration challenge at Stampin' Royalty!
If you look carefully at this card, you will see there is nothing fancy that couldn't easily be recreated by you :o)
I did cut out the wording by hand, which can take a little practice and patience, but you could also stamp in the bottom right corner before embossing, which was my original plan, but forgot to stamp it before embossing....see, none of us are perfect! haha! 
You should check out the inspiration picture at Stampin' Royalty and play along with us!! 

Wednesday, July 3, 2013

Taking Notes

my sample project for this weeks Stampin' Royalty Anything Goes challenge is a fancy Notepad holder!

I used a sheet of Naturals White for the cover, because it is a night sturdy weight. I measured my notepad,  then cut and scored it accordingly, making sure to remember the depth of the sides, then die cut the top edge. 
I then opened the cardstock base up, stamped the images after using just regular thin paper as a mask on the 'back' part to keep the ink only on the front where i wanted it, 'highlighted' the leaves with gumball green using my blender pens, then added some butterflies and a piece of patterned paper that fit the top flap.  lastly, i adhered ribbon that i had made into a bow, and I used a thick circle of Tombow Glue on the underside of the flap that i allowed to dry so as to make it tacky, but you can use magnets, snaps, buttons, velcro, etc. I then used Sticky Strip on the back of the notepad to adhere it to the cover. This was actually a pretty easy project, even with making it from scratch through trial and error. 
here it is open, and you can see the notepad inside.
(sorry for the poor quality of the photo)