Sunday, August 30, 2009
It's the most wonderful time of the year!
There was a really cute commercial a few years back around back-to-school time that had "The most wonderful time of the year" playing as the parents danced through the aisles while shopping. I always got a good laugh at that commercial! It is so true, though!
Although it's a little sad that my baby girl is going in to first grade which means she is growing up, I also have to say that I have been anticipating this day for a very long time! My little girl needs something (besides me) to keep her occupied! Yay! more stamping time!
Here is today's Super Simple Monday card. It uses the Always, and Pocket Silhouettes sets, and the Always in Bloom wheel. This card would take less than 5 minutes! Give it a try!
Ok, more Christmas cards to come this week! Also a few pictures from my daughters 6th birthday party last week!
Wednesday, August 26, 2009
For the birds!
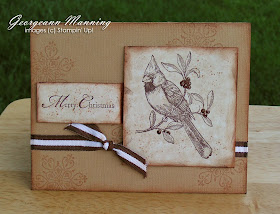
I don't know what it is, but I really like this stamp just plain and uncolored. Something artistic about the sketch look of it. I did however, add some matching colored glitter to the berries to give it that sparkle. It looks really good in person, you can't see the sparkle here on the picture.
I used A Cardinal Christmas and Winter Post sets and different brown inks for this card.
Tuesday, August 25, 2009
Christmas Card Challenge
Ok! Here is the other card I made for our challenge!
I used some retired paper, but if you wanted to make this card, I'm sure you can find a cute paper to use!
Oh, how I love this new Delightful Decorations ornament set and matching punch from the Holiday Mini catalog! If I were to recommend something for a beginner wanting to make their own Christmas cards this year, I would recommend these!
I realized after I had made this card, though, that I used a piece of white for the sentiment block instead of vanilla. I'm sure most people wouldn't even notice, but I did! oops! heehee.
I added gold ribbon and a jewel to give it sparkle and shimmer.
I will probably be posting a lot more Christmas cards from now on, along with other kind as well.
I have to start preparing for this years bazaar!
Monday, August 24, 2009
Super Simple Monday
Well, I am proud to say I was able to stick with the challenge that my blogging buddy Julie and I are doing!
The challenge was to create 2 Christmas cards last week, one simple and one more elaborate.
Well, here is my simple design!
This design is GREAT for when you want to make a bundle of cards in very little time.
I used embossing on these cards in gold and silver on Shimmer white cardstock, but you can get almost the same look in either Close to Cocoa or Going Gray on Whisper White. Add a little glitter or bling, and you really have something elegant!
The hardest part about these cards was the embossing! For best results, I would suggest using the Stampamajig for the sentiment to get it right where you want it and straight.
Tomorrow I will post my more elaborate card!
Hope you like!
Stamp sets used:
Snow Swirled
Snowflake Spot
A Cardinal Christmas
Friday, August 21, 2009
Wednesday, August 19, 2009
Wednesday already?
Wow, I can't believe how the days are just flying by! I am kind of looking forward to next month, though, cause my kids will be back in school. That means more stamping time for mommy!
In the meantime, here is another one from the set of Thank You's I made for a customer.
This card uses the One of a Kind and Elegant Greetings sets.
The cardstock is Purely Pomegranate, and the DSP is from a couple years ago.
In the meantime, here is another one from the set of Thank You's I made for a customer.
This card uses the One of a Kind and Elegant Greetings sets.
The cardstock is Purely Pomegranate, and the DSP is from a couple years ago.
Tuesday, August 18, 2009
She sells sea shells
Monday, August 17, 2009
Super Simple Monday (kind of!)
Well, my intent was to stick to my Super Simple Monday format, but it looks like my computer, which is upstairs, is now without internet (long story) and so I have to use my husbands to do all my online stuff. The problem is, all my pictures and everything are on my upstairs computer. So while I am trying to get all the details worked out so things are running smoothly again, I am posting a picture of a semi-simple card I made this week. I used Pink Pirouette cardbase, and Pretty in Pink Designer Series Paper, and of course, my Top Note Die cut for the panel! I used markers and a blender pen to color the image. the rest is pretty self explanatory!
This card would take about 10 minutes, once you have all your supplies gathered.
Challenge: In my quest to get a head start on my Christmas cards this year, My blogging buddy Julie challenged me to make 2 Christmas cards this week, one easy, the other a few notches up. She also suggested I challenge my readers to do the same! So here goes! I am challenging all who read this to start thinking Christmas! Make 2 cards, you can make them as simple or elaborate as you like, then scan or take a picture of them and send me those pictures! I would LOVE to see them!
My email is georgeannmanning@hotmail.com
Be sure to put 'Christmas Card Challenge' in the subject line!
Send 'em over! I will post my creations next week, and I may even post yours!!
Friday, August 14, 2009
Happy Birthday Fishes!
I just love the colors on this card!
Well, this concludes my Birthday card set! Next week will be a few misc. cards that I have made in the last few months until I can get some new stuff made! I really want to start working on Christmas stuff now! Christmas always sneaks up on me every year, and I never get done all that I plan.
Plus if I start posting Christmas stuff, maybe it will help you get into the Christmas mood too, and we can both get a jumpstart!
See you next week!
Thursday, August 13, 2009
Wednesday, August 12, 2009
Goin' Swimming
I have a set from many years ago that I absolutely LOVE! Fishy Friends is one of my all time favorite sets. I pulled it out to work on my birthday cards, and I made 3 of them, which I will post. That will conclude my birthday block!
I stamped the fish with Stazon Black, then used Prismacolor pencils and Gamsol to color him.
The sentiment is from A Greeting for all Reasons. the background bubbles are made from Itty Bitty Backgrounds.
I stamped the fish with Stazon Black, then used Prismacolor pencils and Gamsol to color him.
The sentiment is from A Greeting for all Reasons. the background bubbles are made from Itty Bitty Backgrounds.
Tuesday, August 11, 2009
I love it when a card comes together!
I had made a BUNCH of cards using this cupcake stamp from the More the Merrier hostess set from the new catalog, but most of them sold before I had a chance to photograph them. I was sure to get a pic of this one, cause I really like it!
This card is funny how it came about, cause I had actually started with a cardbase with a strip of patterned paper on it, and for the longest time, I didn't know what to do with it. I just wasn't inspired with it.
So I put it away in my half finished cards pile, and forgot about it. Well, while working on my birthday cards, I made the image and colored it, and looked through my half finished cards to see if something went together. These two magically came together and it was meant to be! And to top it off, the punched border piece was actually part of a mess up piece that was sitting on my desk from a day earlier!
I put a little glitter on the cupcakes, but you can't see it here.
Set used: The More the Merrier, Hugs and Wishes. Soft Sky, Pretty in Pink cardstock.
Monday, August 10, 2009
Super Simple Monday
Ok! I remembered to do a Super Simple Monday post! AND it goes along with my Birthd ay theme! yay!
This card is actually pretty simple if you break it down.
It basically has a strip of patterned paper bordered in white across the middle, easy so far, right?
Then you stamp the image from Crazy for Cupcakes in Stazon, adding the curved sentiment from the same set, then you color in the cupcake! I used a combination of markers and the watercolor technique.
Put it all on a cardbase, and you are done! This card takes about 5-10 minutes, depending on how long it takes you to color.
Friday, August 7, 2009
"Bubble" Birthday #3
This was as far as I got using punched circles for now. I am sure I will use them again, cause I really like the way the cards turned out!
What I really like about them is that they are a design element all their own. You can utilize the shape, the colors, the size, and you can even use patterned paper circles too! Use those scraps!
Next week, I will have more....you guessed it....birthday cards! Stay Tuned!
What I really like about them is that they are a design element all their own. You can utilize the shape, the colors, the size, and you can even use patterned paper circles too! Use those scraps!
Next week, I will have more....you guessed it....birthday cards! Stay Tuned!
Thursday, August 6, 2009
"Bubble" Birthday card #2
Wednesday, August 5, 2009
Experimenting with "bubbles"
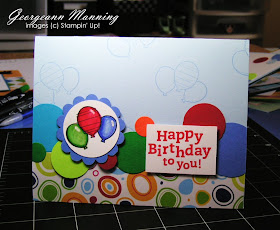
I have noticed some cards lately that have been utilizing different size circles as part of their design. I call them "bubbles", cause thats what they remind me of. I wanted to try my hand at making some cards using "bubbles" and I made a few birthday cards that I will be posting here the next few days.
This is also a perfect way to use up scraps!! Every piece you see on this card came from my scrap pile!
Bubble Birthday card: Bitty Birthday, Birthday Wish
This is also a perfect way to use up scraps!! Every piece you see on this card came from my scrap pile!
Bubble Birthday card: Bitty Birthday, Birthday Wish
Tuesday, August 4, 2009
Birthdays, Birthdays, Birthdays!
Well, I have had a TON of requests from people who buy cards from me for birthday cards, and the ones I had in my stash went quick, so I had to buckle down and take a few days and do nothing but birthday cards. I made roughly 20 of them, and unfortunately, I didn't get pictures of all of them cause they sold quickly too!
But I made a few more and was able to get pictures of those before they disappeared. This was one of them! I will be posting more in the next few days! Sorry for the poor quality pictures, I was in a hurry, and I am trying to get used to the lighting in my new craftroom!
This card uses Crazy for Cupcakes and Hugs and Wishes sets.
Monday, August 3, 2009
Super Simple Monday
I have been meaning to keep up with my super simple Monday posts, but I got a bit distracted along the way. The whole premise of Super Simple Monday, is although Monday's can be busy and hectic, I thought I would show how you can still take a few minutes to make a simple card that doesn't have to be fussy or take a lot of time.
This card was actually co-designed by my wonderful mother. We had a stamp day together and this was one of the cards we came up with.
Its made with Very Vanilla cardbase, and a strip of patterned paper.
We stamped the leaves randomlyon the cardbase in old olive using the stamping off technique (where you ink the stamp, then stamp off once on a scratch piece of paper, then stamp the image on your project)
Then we adhered a small strip of white to the strip of patterned paper to create a border. Then we adhered the patterned paper.
Next we stamped the sentiment in basic gray, then used the same branch stamp (stamped off once) over the sentiment.
We punched out the sentiment with a circle punch, then punched out the larger circle of Ruby Red, then punched a scalloped circle in Old Olive. Adhered the whole thing together and voila! This card would take about 5 minutes, once you have gathered your supplies.